Intro
Given the fact that AWS now offers a bare metal service as another choice of EC2 instances, you are now able to deploy virtual machines based on HVM technologies, like KVM, without tackling the heavy performance overhead imposed by nesting virtualization. This condition enables you to leverage the highly scalable and available AWS public cloud infrastructure in order to deploy your own cloud platform based on full virtualization.
Architecture Overview
The goal is to have a private cloud running KVM virtual machines, able to communicate to each other, the hosts, and the Internet, running on remote and/or local storage.
Compute
I3.metal instances, besides being bare metal, have a very high compute capacity. We can create a powerful private cloud with a small number of these instances roleplaying worker nodes.
Orchestration
Since OpenNebula is a very lightweight cloud management platform, and the control plane doesn’t require virtualization extensions, you can deploy it on a regular HVM EC2 instance. You could also deploy it as a virtual instance using a hypervisor running on an i3.metal instance, but this approach adds extra complexity to the network.
Storage
We can leverage the i3.metal high bandwidth and fast storage in order to have a local-backed storage for our image datastore. However, having a shared NAS-like datastore would be more productive. Although we can have a regular EC2 instance providing an NFS server, AWS provides a service specifically designed for this use case, the EFS.
Networking
OpenNebula requires a service network, for the infrastructure components (frontend, nodes and storage) and instance networks for VMs to communicate. This guide will use Ubuntu 16.04 as base OS.
Limitations
AWS provides a network stack designed for EC2 instances. Since you don’t really control interconnection devices like the internet gateway, the routers or the switches. This model has conflicts with the networking required for OpenNebula VMs.
- AWS filters traffic based on IP – MAC association
- Packets with a source IP can only flow if they have the specific MAC
- You cannot change the MAC of an EC2 instance NIC
- EC2 Instances don’t get public IPv4 directly attached to their NICs.
- They get private IPs from a subnet of the VPC
- AWS internet gateway (an unmanaged device) has an internal record which maps pubic IPs to private IPs of the VPC subnet.
- Each private IPv4 address can be associated with a single Elastic IP address, and vice versa
- There is a limit of 5 Elastic IP addresses per region, although you can get more non-elastic public IPs.
- Elastic IPs are bound to a specific private IPv4 from the VPC, which bounds them to specific nodes
- Multicast traffic is filtered
If you try to assign an IP of the VPC subnet to a VM, traffic won’t flow because AWS interconnection devices don’t know the IP has been assigned and there isn’t a MAC associated ot it. Even if it would has been assigned, it would had been bound to a specific MAC. This leaves out of the way the Linux Bridges and the 802.1Q is not an option, since you need to tag the switches, and you can’t do it. VXLAN relies on multicast in order to work, so it is not an option. Openvswitch suffers the same link and network layer restriction AWS imposes.
Workarounds
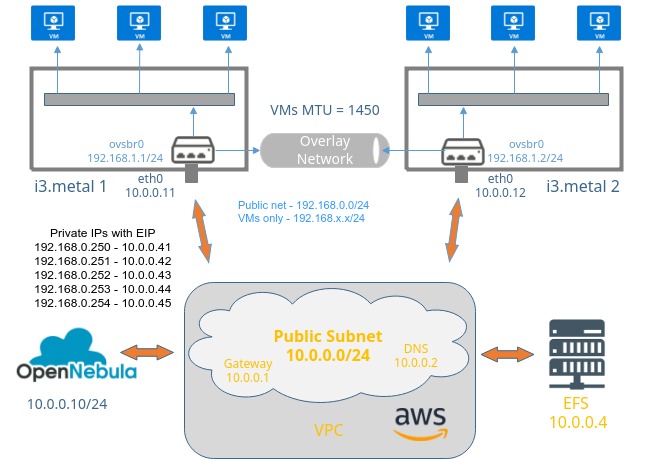
OpenNebula can manage networks using the following technologies. In order to overcome AWS network limitations it is suitable to create an overlay network between the EC2 instances. Overlay networks would be ideally created using the VXLAN drivers, however since multicast is disabled by AWS, we would need to modify the VXLAN driver code, in order to use single cast. A simpler alternative is to use a VXLAN tunnel with openvswitch. However, this lacks scalability since a tunnel works on two remote endpoints, and adding more endpoints breaks the networking. Nevertheless you can get a total of 144 cores and 1TB of RAM in terms of compute power. The network then results in the AWS network, for OpenNebula’s infrastructure and a network isolated from AWS encapsulated over the Transport layer, ignoring every AWS network issues you might have. It is required to lower the MTU of the guest interfaces to match the VXLAN overhead.
In order to grant VMs Internet access, it is required to NAT their traffic in an EC2 instance with a public IP to its associated private IP. in order to masquerade the connection originated by the VMs. Thus, you need to set an IP belonging to the VM network the openvswitch switch device on an i3.metal, enablinInternet-VM intercommunicationg the EC2 instance as a router.
In order for your VMs to be publicly available from the Internet you need to own a pool of available public IP addresses ready to assign to the VMs. The problem is that those IPs are matched to a particular private IPs of the VPC. You can assign several pair of private IPs and Elastic IPs to an i3.metal NIC. This results in i3.metal instances having several available public IPs. Then you need to DNAT the traffic destined to the Elastic IP to the VM private IP. You can make the DNATs and SNATs static to a particular set of private IPs and create an OpenNebula subnet for public visibility containing this address range. The DNATs need to be applied in every host in order to give them public visibility wherever they are deployed. Note that OpenNebula won’t know the addresses of the pool of Elastic IPs, nor the matching private IPs of the VPC. So there will be a double mapping, the first, by AWS, and the second by the OS (DNAT and SNAT) in the i3.metals :
Elastic IP → VPC IP → VM IP→ VPC IP → Elastic IP
→ IN → Linux → OUT
Setting up AWS Infrastructure for OpenNebula
You can disable public access to OpenNebula nodes (since they are only required to be accessible from frontend) and access them via the frontend, by assigning them the ubuntu user frontend public key or using sshuttle.
Summary
- We will launch 2 x i3.metal EC2 instances acting as virtualization nodes
- OpenNebula will be deployed on a HVM EC2 instance
- An EFS will be created in the same VPC the instances will run on
- This EFS will be mounted with an NFS client on the instances for OpenNebula to run a shared datastore
- The EC2 instances will be connected to a VPC subnet
- Instances will have a NIC for the VPC subnet and a virtual NIC for the overlay network
Security Groups Rules
- TCP port 9869 for one frontend
- UDP port 4789 for VXLAN overlay network
- NFS inbound for EFS datastore (allow from one-x instances subnet)
- SSH for remote access
Create one-0 and one-1
This instance will act as a router for VMs running in OpenNebula.
- Click on Launch an Instance on EC2 management console
- Choose an AMI with an OS supported by OpenNebula, in this case we will use Ubuntu 16.04.
- Choose an i3.metal instance, should be at the end of the list.
- Make sure your instances will run on the same VPC as the EFS.
- Load your key pair into your instance
- This instance will require SGs 2 and 4
- Elastic IP association
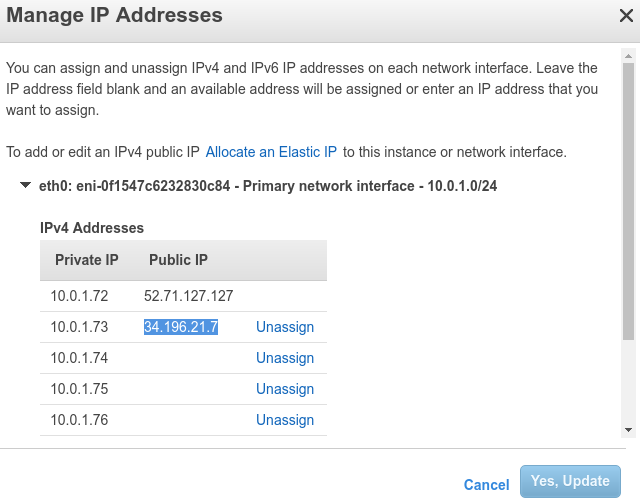
- Assign several private IP addresses to one-0 or one-1
- Allocate Elastic IPs (up to five)
- Associate Elastic IPs in a one-to-one fashion to the assigned private IPs of one-0 or one-1
Create one-frontend
- Follow the same steps of the nodes creation, except
- Deploy a t2.medium EC2 instance
- It is also required SG1
Create EFS
- Click on create file system on EFS management console
- Choose the same VPC the EC2 instances are running on
- Choose SG 3
- Add your tags and review your config
- Create your EFS
After installing the nodes and the front-end, remember to follow shared datastore setup in order to deploy VMs using the EFS. In this case, you need to mount the filesystem exported by the EFS on the corresponding datastore id the same way you would with a regular NFS server. Take a look at EFS doc to get more information.
Installing OpenNebula on AWS infrastructure
Follow Front-end Installation.
Setup one-x instances as OpenNebula nodes
Install opennebula node, follow KVM Node Installation. Follow openvswitch setup, don’t add the physical network interface to the openvswitch.
You will create an overlay network for VMs in a node to communicate with VMs in the other node using a VXLAN tunnel with openvswitch endpoints.
Create an openvswitch-switch. This configuration will persist across power cycles.
apt install openvswitch-switch

ovs-vsctl add-br ovsbr0
Create the VXLAN tunnel. The remote endpoint will be one-1 private ip address.
ovs-vsctl add-port ovsbr0 vxlan0 -- set interface vxlan0 type=vxlan options:remote_ip=10.0.0.12
This is one-0 configuration, repeat the configuration above in one-1 changing the remote endpoint to one-0.
Setting up one-0 as the gateway for VMs
Set the network configuration for the bridge.
ip addr add 192.168.0.1/24 dev ovsbr0

ip link set up ovsbr0
In order to make the configuration persistent
echo -e "auto ovsbr0 \niface ovsbr0 inet static \n address 192.168.0.1/24" >> interfaces
Set one-0 as a NAT gateway for VMs in the overlay network to access the Internet. Make sure you SNAT to a private IP with an associated public IP. For the NAT network.
iptables -t nat -A POSTROUTING -s 192.168.0.0/24 -j SNAT --to-source 10.0.0.41
Write the mappings for public visibility in both one-0 and one-1 instances.
iptables -t nat -A PREROUTING -d 10.0.0.41 -j DNAT --to-destination 192.168.0.250

iptables -t nat -A PREROUTING -d 10.0.0.42 -j DNAT --to-destination 192.168.0.251

iptables -t nat -A PREROUTING -d 10.0.0.43 -j DNAT --to-destination 192.168.0.252

iptables -t nat -A PREROUTING -d 10.0.0.44 -j DNAT --to-destination 192.168.0.253

iptables -t nat -A PREROUTING -d 10.0.0.45 -j DNAT --to-destination 192.168.0.254
Make sure you save your iptables rules in order to make them persist across reboots. Also, check /proc/sys/net/ipv4/ip_forward is set to 1, opennebula-node package should have done that.
Defining Virtual Networks in OpenNebula
You need to create openvswitch networks with the guest MTU set to 1450. Set the bridge to the bridge with the VXLAN tunnel, in this case, ovsbr0.
For the public network you can define a network with the address range limited to the IPs with DNATs and another network (SNAT only) in a non-overlapping address range or in an address range containing the DNAT IPs in the reserved list. The gateway should be the i3.metal node with the overlay network IP assigned to the openvswitch switch. You can also set the DNS to the AWS provided DNS in the VPC.
Public net example:
Testing the Scenario BRIDGE = "ovsbr0"
 DNS = "10.0.0.2"
 GATEWAY = "192.168.0.1"
 GUEST_MTU = "1450"
 NETWORK_ADDRESS = "192.168.0.0"
 NETWORK_MASK = "255.255.255.0"
 PHYDEV = ""
 SECURITY_GROUPS = "0"
 VLAN_ID = ""
 VN_MAD = "ovswitch"
Testing the Scenario
You can import a virtual appliance from the marketplace to make the tests. This should work flawlessly since it only requires a regular front end with internet access. Refer to the marketplace documentation.
VM-VM Intercommunication
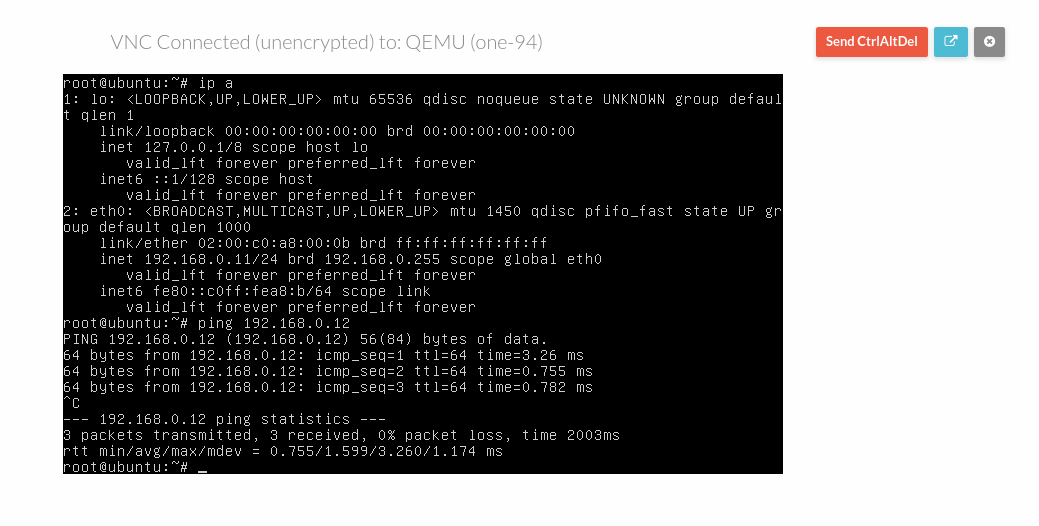
Deploy a VM in each node …
and ping each other.
Internet-VM Intercommunication
Install apache2 using the default OS repositories and view the default index.html file when accessing the corresponding public IP port 80 from our workstation.
First, check your public IP
Then access port 80 of the public IP. Just enter the IP address in the browser.





Just a quick reminder, since OpenNebula EDGE now supports LXD you can apply the ideas exposed here to a cheaper infrastructure by using HVM EC2 instances since containers don’t require virtualization extensions. This will allow you to avoid incurring in the notably expensive fee of the i3.metal instances.
Daniel, Linux Bridges also support VXLAN. Do you see any problems in using them instead of openswitch switch?
Hi Dmitry! Thanks for your comment. As long as you can create an overlay network, built on top of the EC2 instances (the ONE hosts) network, there should be no issues.