Today I’m writing about the steps I’ve followed when creating a KVM VyOS image for OpenNebula that accepts some contextualization variables.
I hope this post helps users to extend the contextualization support and create your own VyOS appliances and share them in the marketplace, e.g why don’t you try to follow these steps to create an image for Xen and VMWare?
The first part of the post will help you to create a KVM image using Sunstone, the second part explains how we can add contextualization to our VyOS image.
Let’s begin!
First part – Creating a VyOS KVM image
This is easy for most of the users, however I think it’s always good to show these steps to newcomers. These are only my recommendations, they’re not mandatory, I’m just letting you know what works for me.
- First, download the latest stable image for virtual 64 bits (or 32 bits) from VyOS adding the ISO as a virtio CDROM image (vd prefix).
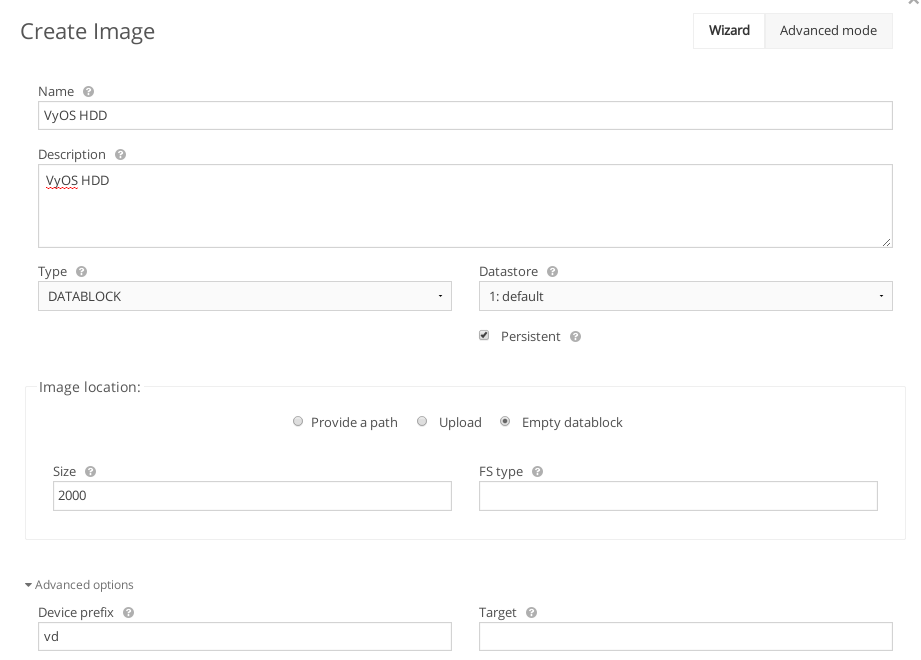
- Let’s create a 2GB Hard Disk image. I use a persistent, empty, datablock to create a VirtIO HDD. Once the HDD is created, remember to change the TYPE from DATABLOCK to OS.

- Once we have an ISO image and a HDD it’s time to create a template. In my case I add a network interface so I can later configure VyOS using SSH. Using the wizard these are the most important parts I configure:
- General -> Memory. We’ll need at least 256 MB RAM (512 MB recommended).
- General -> Hypervisor. KVM in my example 😀
- Graphics -> VNC.
- Network. When creating a NIC I use the advanced options and select virtio for the NIC Model.
- OS Booting. Arch -> x86_64
- OS Booting 1st Boot -> CDROM. It’s quite important to ensure the VM will boot the CD first unless you want a “AMD64 – No bootable device error” error.
- OS Booting 2nd Boot -> HD
- After our template is ready let’s instantiate it!. If everything works fine we’ll have access to the console using VNC.
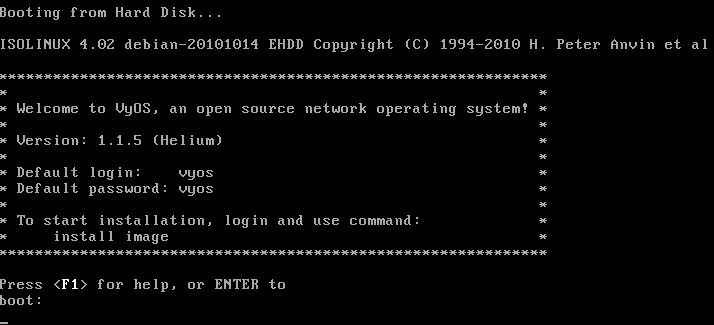
- Vyos default username and password are both vyos. Once we’re in, we can install VyOS in our HDD image using the following command:
install image
- The installation wizard will ask some questions:
- VyOS image to a local hard drive. Would you like to continue? (Yes/No) [Yes]:
- Partition (Auto/Parted/Skip) [Auto]:
I found the following drivers on your system:
vda 2097MB
vdb 247MB
Install the image on? [vda]: -
This will destroy all data on /dev/vda.
Continue? (Yes/No) [No]: Yes
-
How big of a root partition should I create? (1000MB – 2097MB) [2097]MB:
Creating filesystem on /dev/vda1: OK
- What would you like to name this image? [1.1.5]
- I found the following configuration files:…
Which one should I copy to vda? [/config/config.boot]: - Enter password for user ‘vyos’:
- Which drive should GRUB modify the boot partition on? [vda]:
- Once the system is installed we can run the poweroff command:
poweroff
- The HDD is ready so we only have to update our template removing the CDROM and selecting HD as the 1st Boot device in the OS Booting tab. Then we can instantiate the VyOS template again.
- In the second part I’ll use SSH to run some commands so I first enable a NIC and start the SSH service using the following VyOS commands. In my example I’m using the 192.168.4.11 IP address.
config
set interfaces ethernet eth0 address 192.168.4.11/24
commit
set service ssh
commit
- Now we have a VyOS image with SSH and we’re ready to start with part two.
Second part – Adding the contextualization script
VyOS is a fork of the Vyatta Community Edition. Vyatta’s forum was full of useful information and it helped me to find answers to “where should I start to add contextualization?”. Unfortunately, when Brocade acquired Vyatta, the forum disappeared, so I don’t know really who should receive credit for the info I gathered… I only can say thanks to Vyatta’s community and wishing the best for the new VyOS community.
All right. Let’s try to explain the magic.
If we add to VyOS a script called vyatta-postconfig-bootup.script, VyOS will run any command in that script, once VyOS is ready and the configuration has been loaded. In this script, we try to mount the OpenNebula’s CDROM containing the context.sh script which will load the contextualization environment variables (please see the official OpenNebula’s documentation) to get a deeper understanding of contextualization. In any case, VyOS will launch the vyatta-vmcontext.sh bash script afterward.
The vyatta-vmcontext.sh (it can be renamed, of course) uses the vyatta-cfg-cmd-wrapper command to encapsulate VyOS commands that will alter the configuration. The wrapper commands must be declared between a begin, a commit and, of course, an end. Using one of the OpenNebula’s contextualization scripts as a template, I’ve added VyOS command that will be executed if some context variables are ready (e.g the IP and MASK…). I think this script it’s quite easy to follow but don’t hesitate to send your doubts and feedback to add a FAQ to this post.
Hands on.
- We’ll need two bash scripts that I’ve uploaded to my Github account. You can clone the repo:
git clone https://github.com/n40lab/vyos-onecontext.git
cd vyos-onecontext
- Now we’ll scp the files to our VyOS VM using the vyos username and the vyos password (unless you’ve changed it during the installation). My VyOS router is listening on the 192.168.4.14 address.
scp vyatta-vmcontext.sh vyos@192.168.4.14:/tmp/
scp vyatta-postconfig-bootup.script vyos@192.168.4.14:/tmp/
- Using SSH and sudo we’ll move the scripts to the right directories:
ssh vyos@192.168.4.14
sudo mv /tmp/vyatta-postconfig-bootup.script /opt/vyatta/etc/config/scripts/vyatta-postconfig-bootup.script
sudo mv /tmp/vyatta-vmcontext.sh /opt/vyatta/sbin/
- In order to use the contextualization, we must first remove SSH service and the ethernet address and any changes we’ve made to VyOS config:
delete service ssh
delete interfaces ethernet eth0
- We can edit the file /boot/grub/grub.cfg (sudo vi /boot/grub/grub.cfg) and delete the following lines:
serial --unit=0 --speed=9600
terminal_output --append serial
echo -n Press ESC to enter the Grub menu...
if sleep --verbose --interruptible 5 ; then
terminal_input console serial
fi

menuentry "VyOS 1.1.5 linux (Serial console)" {
linux /boot/1.1.5/vmlinuz boot=live quiet vyatta-union=/boot/1.1.5 console=tty0 console=ttyS0,9600
initrd /boot/1.1.5/initrd.img
}

menuentry "VyOS 1.1.5 linux (USB console)" {
linux /boot/1.1.5/vmlinuz boot=live quiet vyatta-union=/boot/1.1.5 console=tty0 console=ttyUSB0,9600
initrd /boot/1.1.5/initrd.img
}

menuentry "Lost password change 1.1.5 (Serial console)" {
linux /boot/1.1.5/vmlinuz boot=live quiet vyatta-union=/boot/1.1.5 selinux=0 console=tty0 console=ttyS0,9600 init=/opt/vyatta/sbin/standalone_root_pw_reset
initrd /boot/1.1.5/initrd.img
}

menuentry "Lost password change 1.1.5 (USB console)" {
linux /boot/1.1.5/vmlinuz boot=live quiet vyatta-union=/boot/1.1.5 selinux=0 console=tty0 console=ttyUSB0,9600 init=/opt/vyatta/sbin/standalone_root_pw_reset
initrd /boot/1.1.5/initrd.img
}
Removing the console, will help us to avoid the following error-> INIT: Id “TO” respawing too fast: disabled for 5 minutes.
- Unless we’ve added a KVM serial port we can delete the console:
delete system console
- Finally we can delete the bash history, commit and save the changes:
> /home/vyos/.bash_history
commit
save
exit
reboot
Please remember: Once you reboot your image, the contextualization script will try to autoconfigure your VyOS router, however, no changes are saved unless you explicitly use the save command. If you use the save command you should stop using the contextualization scripts to avoid clashes between your saved configuration and the one from context… so execute:
sudo cat /dev/null > /opt/vyatta/etc/config/scripts/vyatta-postconfig-bootup.script
Phew!. It’s been a long post and it’s hard to include all the information without boring you. I hope you have understood how you can use some scripts to add context to your own VyOS image. Soon I’ll post here some more information about VyOS but in the while you can start improving your VyOS images.
Cheers!


0 Comments