Work done by Debasis Roy Choudhuri, Bharat Bagai, Joydipto Banerjee, Udaya Keshavadasu, Rajeev D Samuel, Mitesh Chunara & Krishna Singh at the Business Application Modernization (BAM) Department of IBM India.
In this blog we try to highlight some of the key elements involved in building a private Cloud environment using OpenNebula.
Scope
The goal was to setup a Platform-as-a-Service (PaaS) sandbox environment, where our practitioners can get a hands-on practice on various open Source based tools and technologies. We were successful in creating an On-Demand model where Linux based images having required software (e.g. MySQL, Java or any configurable middleware) could be provisioned using the OpenNebula web based interface (Sunstone) along with email notification to the users.
The highlight of the entire exercise was using nested Hypervisors to setup OpenNebula cloud – a feature which was probably being tried out for the first time (we checked the public domain and OpenNebula forums where nobody was sure if such a scenario existed; and were not certain if it was feasible ).
Implementation
We started with OpenNebula version 2.2 and then later on upgraded to 3.0. Hypervisor used was VMware ESX 4.1 and Centos 5.5 & 6.0 OS was used for the provisioned images. The hardware employed was IBM System x 3650 M2 for Cloud Management environment and administration while IBM SAN storage for provision of images.
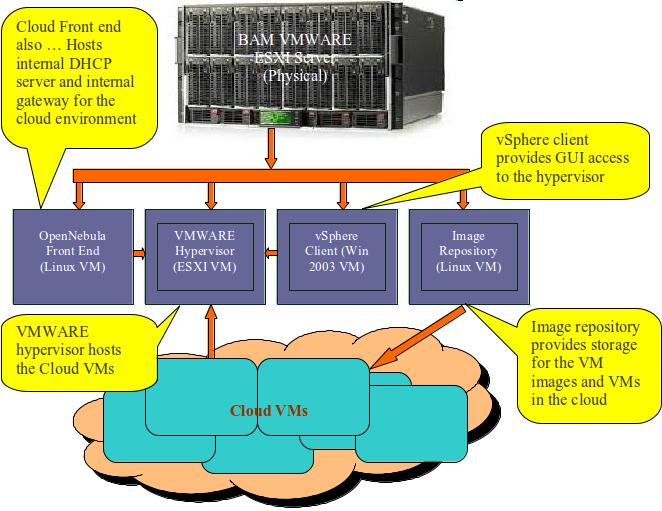
Here’s the architecture diagram –
We have configured the above scenario in a single ESXi box (Physical Server).
As you can see in the architecture diagram, we configured OpenNebula(Front end) to use the VMware hypervisor(ESXi VM) to host VMs, the VSphere client on a Windows VM to access the ESXi(for admin work). One VM was designated as Image repository where all client images were stored. We also configured NFS on Image repository VM.
Note: – Before starting the installation, you have to install EPEL (Extra Packages for Enterprise Linux). EPEL contains high quality add-on packages for Centos and other Scientific Linux that will be required for compatibility with OpenNebula.
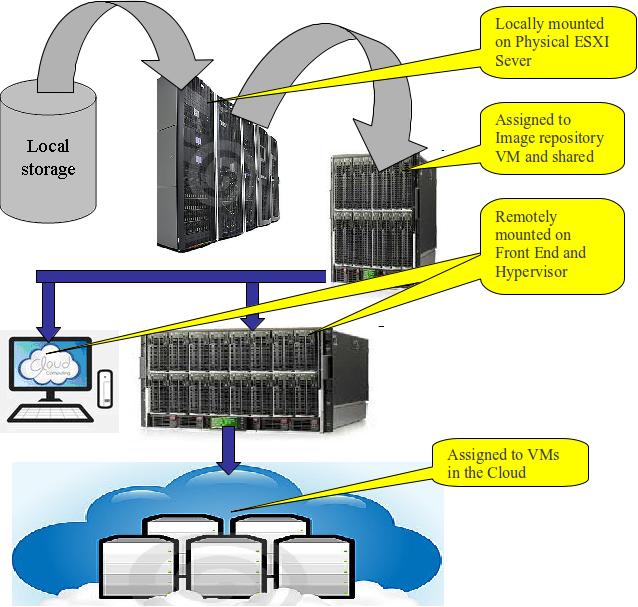
For storage space, we used NFS for OpenNebula and VMware storage. For that we created a separate NFS server or you can use same server. The following is the architect diagram that we used –
In above diagram, we are using SAN storage and mapped it to physical ESXi. After that, storage space has been distributed among VM’s. For Image repository, we took a large chunk of space to make it as NFS server also. This large chunk of space has been shared between ESXi and Front End. Naming of NFS storage space should be same here for all three servers.
One more important point that I have to mention here is that the name of the datastore should be same in both VMware hypervisor and FrontEnd machine as shown below:
A point to note about the VMWare
Remember that your VMware ESX server should not be free version. Either it has to be a limited edition of 60 days or a complete licensed version. Otherwise you will get errors while deploying VM from FrontEnd machine. You may use the following to test VM functionality through command prompt.
/srv/cloud/one/bin/tty_expect -u oneadmin -p password virsh -c ESX:///?no_verify=1
Once the connectivity is established, you can create VM network and deploy VM from FrontEnd machine. I will recommend while creating vmdk file ( which you will later use as an image ), you should install VM tools also.
A point about using context feature:
At present context feature for VMware is not supported by OpenNebula 3.0. This feature has been made available for only KVM and XEN Hypervisors. With the help of context feature, OpenNebula FrontEnd can provide IP address, hostname, DNS Server, gateway, etc to client VM’s. As a workaround for VMware ESXi, we used an alternate method – writing a custom script that emulates OpenNebula’s Context features. This script provides IP address for client, hostname, VMID etc. After assigning these details to the VM, it emails the Cloud admin with the necessary information.
Hints and Tips
Some errors which surfaced during the OpenNebula installation and configuration and their solutions are given below:
- During libvirt addon installation for VMware hypervisor, you might get the following error –
Configure: error: libcurl >= 7.18.0 is required for the ESX driverSolution: Upgrade curl with latest version or curl 7.21.7# rpm –qa | grep –i curlTo remove curl, use following commands# rpm -e --nodeps –-allmatches curl
# rpm -e --nodeps –-allmatches curl-develAnd then configure curl with /usr
To check curl version, you use use these commands,
/usr/bin/curl-config –version

curl -–version
Now try to install libvirt with ESX , with the following command
# configure --with-ESXAlso check that your PKG_CONFIG_PATH refers to “/usr/lib/pkgconfig”.
To check libvirtd version, you can use these commands#/usr/local/bin/virsh -c test:///default listor
# /usr/local/sbin/libvirtd --versionAlso remember that your libvirtd package supports necessary ESX version.
- You may also get errors during restart services –
Starting libvirtd daemon: libvirtd: /usr/local/lib/libvirt.so.0: version `LIBVIRT_PRIVATE_0.8.2' not found (required by libvirtd)Solution: Uninstall libvirtd and then configure libvirtd again with libraries path. Command –#./configure --with-ESX PKG_CONFIG_PATH="/usr/lib/pkgconfig" --prefix=/usr --libdir=/usr/lib64
Challenges Faced
The team faced several challenges during the journey. Some of the interesting ones are highlighted as follows:
- Minimize the infrastructure cost on Cloud physical servers. Workaround: Usage of VMs for cloud components like OpenNebula Front End, Image Repository and Host; usage of VLAN with private IP addresses
- Minimize the cost of provisioning public IP addresses in IBM corporate network for the Cloud infrastructure and the VMs. Workaround: Deployment of dynamic host configuration in the cloud environment with a range of private IP addresses
- Minimize VMware Hypervisor licensing costs. Workaround: Resolved this issue by building a VM with VMware vSphere ESXi hypervisor on parent ESXi hypervisor (nested Hypervisor scenario).
- Configuring a GUI for OpenNebula administration tasks. Workaround: Installing the Sunstone as an add-on product for provisioning of image, creation of VM’s etc & making it compatible with VMware Hypervisor
- Accessibility of the private VMs in the cloud within IBM network. Workaround: Leveraged SSH features: tunneling and port forwarding
- Limitations of OpenNebula product in passing the host configuration to VMs. Workaround: Internal routing for the cloud components and the VMs in the cloud and deployment of dynamic host configuration in the cloud environment
- Dynamic communication to the cloud users/admin on provision/decommission of VMs and host configuration/reconfiguration of the VMs in the cloud. Workaround: Use hooks feature of OpenNebula and shell scripts to embed customized scripts in VM image
Bharat Bagai
bbagai@gmail.com, bagai_bharat@hotmail.com


Hi. I’ve read your work and seen it’s amazing. I’m not a native english speaking man, so excuse me if I badly express myself. Having seen what you have done with openNebula, I would like to know if you could allow users to access VM throught other protocols such as VNC to provide a more confortable access.
HI Paterne
Yes, you can access your VM through VNC. Before that VNC has to be configure in base stack images and you have to open that port through firewall.