In the world of cloud computing, automation is key. It helps in reducing manual effort, increasing efficiency, and ensuring consistency across various deployments. One such tool that aids in automation is Ansible. In this article, we will discuss how to automate the deployment of OpenNebula using Ansible Playbooks.
What is Ansible?
Ansible is an open source software provisioning, configuration management, and application-deployment tool. Using Ansible, you can set up your cloud infrastructure just once and then replicate it as many times as you want with a single command. This is particularly useful for setting up complex environments.
It uses a simple syntax written in YAML called playbooks. YAML is a human-readable data serialization standard, so it’s easy to understand and write. Ansible also has a massive community behind it, providing a wealth of modules and examples that can be used to accomplish almost any automation task.
Why use Ansible with OpenNebula?
Ansible’s simplicity and ease of use make it an excellent choice for automating the deployment of OpenNebula. Since there are multiple combinations of supported storage and networking backends and different optional functionality in OpenNebula, there is a wealth of different possible architectures that can be implemented and deployed as an OpenNebula cloud.
By using Ansible Playbooks to define these different architectures, we can define them once and deploy them multiple times in an automated manner. This significantly improves reproducibility and aids in many aspects of cloud deployment, cloud upgrades, and development.
Automating OpenNebula Deployment
The OpenNebula one-deploy project provides a set of Ansible playbooks for automating the deployment and configuration of OpenNebula. These playbooks are available in the OpenNebula one-deploy GitHub repository.
The playbooks cover various deployment scenarios, including:
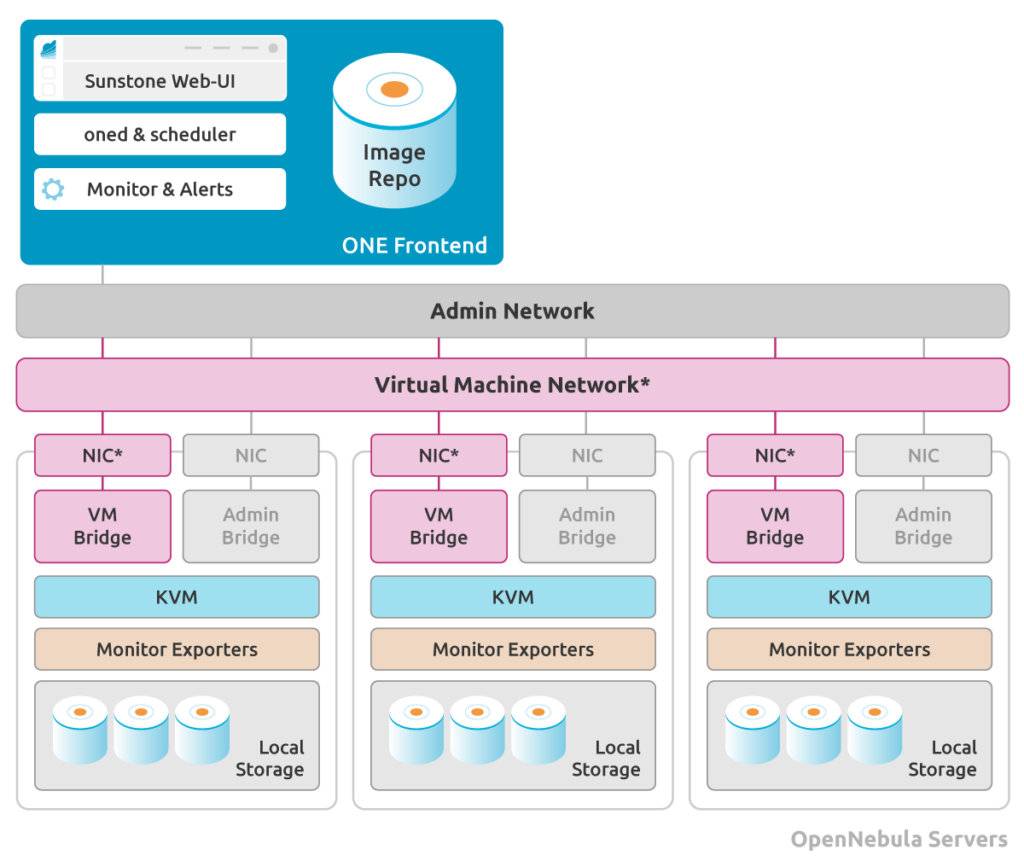
- Single Front-end with Local Storage: This scenario involves a single front-end hosting all the OpenNebula services and a set of hosts that act as hypervisors to run Virtual Machines (VMs). The virtual disk images are stored in local storage, with the front end hosting an image repository (image datastore). These images are subsequently transferred from the front end to the hypervisors to initiate the VMs. More details here.
- Single Front-end with Shared Storage: This scenario is a variation of the local storage setup. Here, the storage for VMs and the image repository are provided by an NFS/NAS server. Running VMs directly from shared storage can enhance the fault tolerance of the system in the event of a host failure, although it comes with the drawback of increased I/O latency. More details here.
The playbooks are designed to be flexible and can be customized to suit your specific needs. They can be used to automate the entire deployment process, from setting up the necessary software and services to configuring networking and storage.

How to Use the Playbooks
To use the playbooks, first you need to clone the GitHub project:
$ git clone https://github.com/OpenNebula/one-deploy.git
Once we have the repository downloaded, make sure to download the necessary dependencies by running the following command inside the repository path:
ansible-galaxy collection install -r requirements.yml
For this example, we will use the inventory of a Single Front-end with Local Storage that we referenced in the previous section:
---
all:
  vars:
    ansible_user: root
    one_version: '6.6'
    one_pass: opennebulapass
    ds:
      mode: ssh
    vn:
      admin_net:
        managed: true
        template:
          VN_MAD: bridge
          PHYDEV: eth0
          BRIDGE: br0
          AR:
            TYPE: IP4
            IP: 172.20.0.100
            SIZE: 48
          NETWORK_ADDRESS: 172.20.0.0
          NETWORK_MASK: 255.255.255.0
          GATEWAY: 172.20.0.1
          DNS: 1.1.1.1

frontend:
  hosts:
    fe1: { ansible_host: 172.20.0.7 }

node:
  hosts:
    node1: { ansible_host: 172.20.0.8 }
    node2: { ansible_host: 172.20.0.9 }
Keep in mind that you can always configure the inventory according to your needs. You can consult the different labels available here.
To use one deploy with the above inventory, there are two possible ways:
- Directly using the one-deploy playbooks with the following command in the root path of the repository:
ansible-playbook -i inventory/example.yml opennebula.deploy.main
- Importing one-deploy into your own playbooks. In order to achieve this, add the local path to the one-deploy repository in your Ansible playbook configuration as follows:
[defaults]
collections_paths=${ONEDEPLOY_PATH}/ansible_collections/
Then, you can import it from your playbook by simply adding the following line:
---
# Your awesome playbook

- ansible.builtin.import_playbook: opennebula.deploy.main
Once modified, you can run your playbook as usual, indicating the inventory previously configured with the variables required by one-deploy:
ansible-playbook -i inventory/example.yml your_awesome_playbook.yml
The playbooks are available as part of the Ansible Galaxy community site. Just take a look at the documentation of each role in the OpenNebula collection to include them in your own playbooks. It’s important to note that until we reach the 1.0 release later this year, any new features and bug fixes will be committed exclusively to the GitHub repository. Rest assured, the Ansible Galaxy collection will be updated once the 1.0 version is officially released.
Conclusion
Automating the deployment of OpenNebula using Ansible playbooks can significantly reduce the time and effort required to set up and manage your cloud infrastructure. Whether you’re a small business looking to set up a private cloud or a large enterprise looking to streamline your cloud management processes, these playbooks provide a robust and flexible solution.


0 Comments